Mid-sized injection molding plants lose tens, if not hundreds, of thousands of dollars annually due to flash—the thin, excess plastic that seeps through mold crevices. This translates into not only scrapped parts but also rework time to trim parts, premature mold wear, and rejected orders from quality-conscious customers. As a professional injection molding machine manufacturer, I hate to see my clients’ factories turn profits into losses due to flash, which often stems from overlooked mold misalignment and excessive injection molding machine pressure. Therefore, it’s crucial to identify, resolve, and prevent flash during injection molding by addressing mold alignment and machine pressure.
What is flash during injection molding?
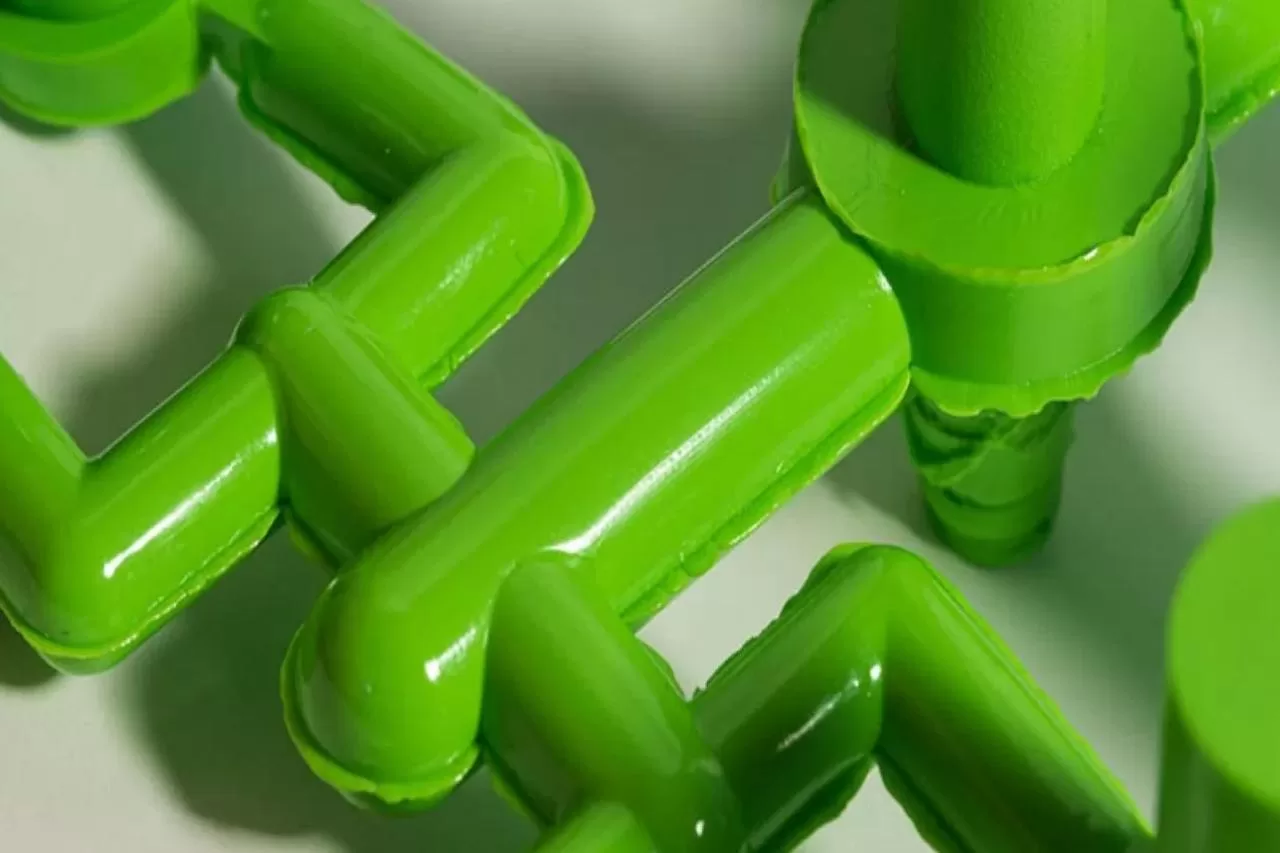
Flash during injection molding refers to thin, gooey, or lumpy plastic that seeps into tiny gaps between mold halves, around ejector pins, or along parting lines during the injection molding process. Flash is not only unsightly but also creates a host of other problems. First, it results in scrap. If flash cannot be trimmed, you may lose 1–3% of parts per injection, and trimming increases labor costs. Secondly, mold damage can occur: over time, excess plastic can wear away mold edges or block vents, leading to expensive rework or replacement. Quality defects can also occur, with parts with flash likely failing dimensional inspection or assembly, leading to customer returns. While improper resin selection or mold design can cause flash issues, we diagnose 70% of flash problems as resulting from improper mold alignment or excessive pressure in the injection molding machine.

Mold Alignment Issues in Injection Molding
The first step in resolving flash issues is to determine whether mold misalignment is the cause. The following methods can diagnose this. First, perform a visual inspection. With the mold closed (but not pressurized), check for uneven gaps along the parting line. A properly aligned mold should have a consistent, fine gap. Next, test with a feeler gauge. Insert a thin feeler gauge at 4-6 points along the parting line (top, bottom, left, right, and diagonal).
If the feeler gauge slides in easily at one point but not at others, the mold is misaligned. Next, test run 10-20 parts using a clear, low-viscosity resin. If flash occurs only on one side of the part or at a specific portion of the parting line, misalignment is likely present. Also, ensure that you evenly bolt the mold to the machine’s movable and fixed platens before the actual injection molding process begins. Loose bolts or uneven torque can cause mold misalignment.
Fixing Mold Alignment Issues and Eliminating Injection Molding Flash
Once you confirm mold alignment, you can correct it using the following methods. First, adjust the tie rods. Most injection molding machines use four tie rods to maintain parallel platens. If the gauge indicates the mold is off-center, loosen the locknuts on the tie rods and rotate the adjustment screws to move the movable platen left or right or up and down. Once aligned, tighten the locknuts and retest with a feeler gauge.
Also, replace worn mold bushings/guides. The mold uses bushings and guides to maintain alignment during the closing process. If these parts are worn, replace them with OEM parts provided by the mold supplier. Wear of bushings is also a major cause of gradual misalignment. If adjusting the tie rods and replacing the bushings doesn’t work (for example, if the machine’s platen has warped), consult a technician from your injection molding machine manufacturer.
Excessive injection molding machine pressure during injection molding
If mold alignment checks are correct, another possible cause is excessive pressure. Injection molding machines use two main pressures to cause flash: clamping pressure (which holds the mold closed) and injection pressure (which pushes the resin into the mold). Diagnosing excessive pressure can be done in the following ways.
You can check the clamping pressure: Most machines display the clamping pressure on the HMI (human-machine interface). If the clamping pressure exceeds the maximum recommended by the injection molding machine manufacturer for your mold size, there’s a problem. If flash appears on all parts (not just one side) and the mold is aligned correctly, excessive injection pressure or speed may cause the resin to enter the tiny mold gap faster than the clamping force can maintain the mold closed. Look for “spraying” near the gate, a classic sign of excessive injection speed/pressure.
Alternatively, you can conduct a part consistency test by reducing the clamping pressure by 5% and the injection pressure by 5%, producing 20 parts. If flash decreases or disappears, it indicates a pressure issue. If parts are short, the pressure is too low, and you need to find the optimal balance between full fill and no flash.
Adjusting Pressure to Prevent Injection Flash
If you discover that the injection molding machine’s pressure is too high, you can adjust two settings: the clamping pressure adjustment. First, reduce the clamping pressure in 5% increments (for example, from 100 tons to 95 tons), molding 10 parts at a time. Stop when the flash disappears, but the part is still filled. For most molds, the optimal clamping pressure should be 10-15% higher than the “minimum pressure to prevent flash.” Next, adjust the injection pressure and speed. If the flash is uniform, first reduce the injection pressure. If the flash is close to the gate, reduce the injection speed; a faster speed will force resin into the gap before the mold seals. You can also monitor the injection molding machine’s “pressure-time” graph; a smooth curve indicates stable pressure.
Fixing flash leads to high-quality products
By focusing on mold alignment and injection molding machine pressure, you can address approximately 70% of flash causes with tools and steps that can be implemented today. Use feeler gauges to diagnose alignment, adjust tie rods or replace bushings for repairs, and leverage HMI data to diagnose pressure, making minor adjustments and verifying them with a trial run. As a professional injection molding machine manufacturer, I help customers improve production efficiency, produce high-quality parts, reduce flash-related waste by 60% to 90%, and ultimately increase profits.
TRENDING POSTS
- CHINAPLAS 2026 is Coming Soon! 2025/10/08
- New Year, New Beginnings: Topstar Robotics Delivers Heartfelt Service to Keep Customers Thriving! 2025/10/08
- TOPSTAR Global Open Day 2025: Humanoid Robot Debuts, Pioneering a New Decade of Intelligent Manufacturing 2025/10/08
- Topstar Showcases TE II Electric Injection Molding Machines at InterPlas Thailand 2025 2025/10/08
HOT TOPIC
- .ervo motor-driven linear robots
- •
- 1.0 guangdong topstar technology co. ltd
- 1.0 topstar china
- 1.0 topstar robot
- 11
- 160℃ mold temperature controller
- 170 ton injection molding machine
- 2
- 21
- 220-ton injection molding machine
- 23
- 260 ton injection molding machine
- 3 axis robot
- 3 axis robots
- 3 in 1 Compact Dehumidifying Dryer
- 3-axis robot
- 3-axis robots
- 39
- 41
- 460T injection molding machine
- 5-axis CNC machine
- 62
- 90 ton injection molding machine
- accuracy
- Air Chillers
- all electric injection molding machine
- all electric injection molding machines
- all-electric injection molding machine
- All-electric injection molding machines
- and overall production quality. Therefore
- AP-RubberPlas
- auto loader
- automated injection molding machine
- Automation changed engineering
- automation of injection molding robots
- automotive parts injection molding
- Auxiliary Equipment
- auxiliary machine
- Bench Injection Molding Machine
- cabinet dryer
- Cabinet dryer manufacturers
- Cabinet dryers
- Cartesian Coordinate Robots
- chiller
- CNC Drilling Machine
- CNC Drilling Machines
- cnc engraving machine manufacturer
- cnc laser cutting machine manufacturer
- CNC machine
- CNC Machine Center
- CNC Machine for Sale
- CNC Machine Manufacturing
- CNC Machine Tool
- CNC machine tool product
- CNC Machining Center
- CNC wood carving machine
- Cooling system
- Cross-Walking Single Axis Servo Cylinder Robot
- Cross-Walking Single-Axis Servo Cylinder Robot
- Cross-Walking Three-Axis/Five-Axis Servo Driven Robot
- cross-walking three-axis/five-axis servo-driven robot
- Dehumidifier Dryer
- Dehumidifying Dryer
- delta parallel robot
- Desktop Injection Molding Machine
- Desktop injection molding machines
- Desktop Molding Machine
- desktop plastic injection machine
- Desktop Plastic Injection Molding Machine
- Digital Transformation
- direct clamp injection molding machine
- Direct clamp injection molding machines
- Dosing & mixing system
- Drilling Centers
- Drying and dehumidification system
- drying and dehumidifying equipment
- Drying and Dehumidifying System
- drying system
- effective and efficient. Cabinet dryers are also used in other industries where large quantities of material need to be dried
- efficient injection molding machine
- elbow hydraulic injection molding machines
- electric injection molding machine
- electric injection molding machines
- energy-efficient injection molding robot
- energy-efficient water chiller
- energy-efficient water chillers
- energy-saving injection molding machine
- etc. Among injection molding robots
- exhibition
- features of CNC machine
- Feeding And Conveying System
- Five Axis Machine Center
- Flexible Production Line
- Fully automatic injection molding machine
- Gathering Topstar
- giant injection molding machine
- GMU-600 5-Axis Machining Center
- Granulating & Recycling System
- granulator machine
- gravimetric blender
- Heavy duty injection molding machine
- High-precision electric molding machines
- high-precision plastic molding machines
- high-speed all electric injection molding machine
- high-speed electric injection molding machine
- High-Speed Packaging Injection Molding
- Honeycomb rotor dehumidifier
- hopper dryer
- Hopper Dryers
- horizontal injection molding machine
- Horizontal Injection Molding Machines
- Horizontal Injection Moulding Machine
- Horizontal Mixer manufacturer
- How The CNC Machine Works
- hybrid injection molding machine
- hydraulic injection molding machine
- Hydraulic Injection Molding Machines
- in this article
- Industrial AI
- Industrial Automation
- Industrial robot
- Industrial Robot Chinese brand
- industrial robot parts
- industrial robot supplier
- Industrial robots
- Industry Chain
- Injection Manipulator
- injection manipulator robot
- injection mold machines
- Injection molding
- Injection molding automation
- Injection Molding Automation Solution
- injection molding dryer
- Injection molding equipment
- injection molding hopper dryer
- Injection molding machine
- injection molding machine brand
- Injection Molding Machine Factory
- Injection Molding Machine Manufacture
- Injection molding machine manufacturer
- injection molding machine manufacturers
- Injection molding machine procurement
- injection molding machine robotic arm
- injection molding machine with a robot
- Injection molding machines
- injection molding material dehumidifying
- injection molding plant
- injection molding process
- Injection Molding Robot
- injection molding robot arm
- Injection molding robot automation
- Injection molding robotic arm
- injection molding robots
- injection molding whole plant
- injection moulding dryer
- Injection moulding machine
- injection moulding machines
- Injection Moulding Robots
- Injection Robot
- Injection robot arm
- Injection robot manufacturer
- Injection robot wholesale
- injection robots
- Intelligent Factory
- intelligent injection molding machines
- Intelligent Manufacturing
- intelligent mold temperature
- intelligent mold temperature controller
- Intelligent mould temperature controller
- InterPlas Thailand 2025
- Introducing Injection Robot
- It is the best choice for drying large quantities of material at once. Cabinetmakers use these machines because they are fast
- Large flow water type mold temperature controller
- large injection molding machine
- large injection molding machines
- Learn what industrial automation and robotics is
- linear robot
- linear robots
- low speed sound-proof granulator
- machine plastic molding
- make sure to add some! Improvements (2) Keyphrase in introduction: Your keyphrase or its synonyms appear in the first paragraph of the copy
- manipulator machine
- manufacturing
- Manufacturing Innovation
- medical grade injection molding machines
- Medical Injection Molding
- medical injection molding machine
- medical injection molding machines
- micro injection molding machine
- middle speed granulator
- Mini CNC machine manufacturers.
- mobile cover making machine
- Mold Temperature Control System
- mold temperature controller
- mold temperature controllers
- molding machine
- molding material Dehumidifying System
- mould temperature control system
- mould temperature controller
- mould temperature controller
- mould temperature controllers
- New electric injection molding machine
- nitrogen dryer manufacturer
- nitrogen dryer system manufacturer
- Oil type mold temperature controller
- Oil type mold temperature controllers
- open day
- optical component injection molding
- Outbound links: No outbound links appear in this page. Add some! Images: No images appear on this page. Add some! Internal links: No internal links appear in this page
- packaging injection molding
- Packaging Solutions
- PET Preform injection molding
- phone case maker machine
- phone case making machine
- phone cover making machine
- PID Control Mold Temperature Controller
- plastic auto loader
- plastic bottle making machine
- plastic bottle manufacturing
- plastic bucket making machine
- plastic bucket manufacturing
- Plastic chair making machine
- plastic dryer for injection molding
- plastic forming equipment
- Plastic Granulators
- plastic hopper dryer
- plastic injection machine
- plastic injection machines
- plastic injection molding
- Plastic injection molding equipment
- Plastic injection molding machine
- Plastic Injection Molding Machines
- plastic injection moulding machine
- plastic injection moulding machines
- plastic injection robot
- plastic molding
- Plastic Molding Industry
- Plastic Molding machine
- plastic molding machine 1
- Plastic Molding Machines
- plastic molding press
- plastic moulding machine
- plastic phone case making machine
- plastic-molding machine
- powerful granulator
- Powerful Type Sound-Proof Granulator
- precision injection molding
- precision injection molding machines
- production of plastic seats
- pure water mould temperature controller
- Robot injection molding
- robot injection molding machine
- robot manufacturing companies
- Robotic arm for injection molding machine
- robotic injection molding machines
- robotics in injection molding
- SCARA robot
- SCARA robots
- Screw dosers
- Service-oriented manufacturing
- Servo Cylinder Robot
- servo driven robot
- Servo Driven Robots
- servo injection molding machine
- servo injection robots
- servo motor-driven linear robots
- servo-driven 3-axis robot
- Servo-driven injection molding machine
- Servo-Driven Robot
- Setup of injection machine
- Silicone Injection Molding Machine
- six-axis industrial robot
- Smart Manufacturing
- soundproof granulator
- Sprue Picker
- Stainless Hopper Dryer
- Stainless Hopper Dryers
- star club
- swing arm robot
- take-out robot
- take-out robots
- Thailand 4.0
- the choice between servo-driven robots and hydraulic robots will have a certain impact on efficiency
- the most popular injection molding machine
- the type of injection molding robot
- TIC2000 Control System
- TMII injection molding machine
- toggle clamp injection molding machine
- Toggle Hydraulic Injection Molding Machines
- toggle injection molding machine
- Top 10 brands of injection robots
- Topstar
- Topstar Electric Injection Molding Machine InterPlas Thailand 2025 Smart Manufacturing Thailand 4.0
- Topstar Engineering
- Topstar Industrial Robots
- Topstar injection molding intelligent
- Topstar Scara Robots
- Useful Injection molding machine
- Vertical machining centers
- volumetric type blender
- water chiller
- water chillers
- water distributor
- water type mold temperature controller
- Water Type MoldTemperature Controller
- Water-Type Mould Temperature Controllers
- We often face choices when performing injection molding. We will choose the type of injection molding machine
- wholesale of injection molding machines
- x carve CNC
- 热门查询 点击次数 展示 排名 topstar