
What Should You Prepare Before Installing a Take-out Robot on an Existing Molding Machine?
2026/11/13 By le zhan
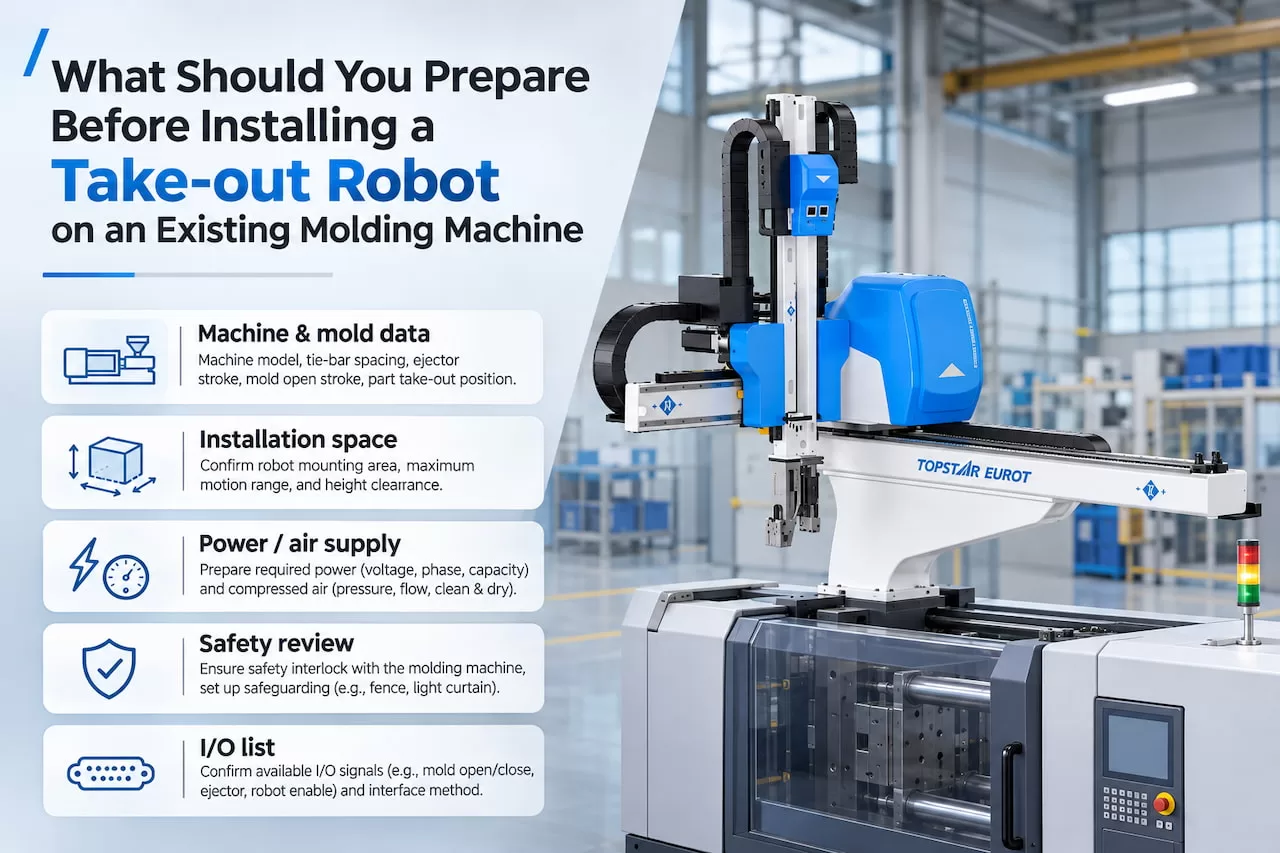
We often encounter situations where a customer already owns an injection molding machine and wants to add a take-out robot but is unsure what conditions to check, what documentation to prepare before installation, or how to ensure the robot will work properly with the existing equipment.
During installation, it is necessary to verify the injection molding machine’s layout, mold clearances, the robot’s load capacity, arm reach, control interfaces, and on-site safety conditions. These verifications ensure that the robot can smoothly access the mold area, retrieve the molded parts, and avoid interference with existing equipment during the transfer process. This series of steps helps prevent modifications during subsequent installation, system integration issues, and unnecessary delays in commissioning.
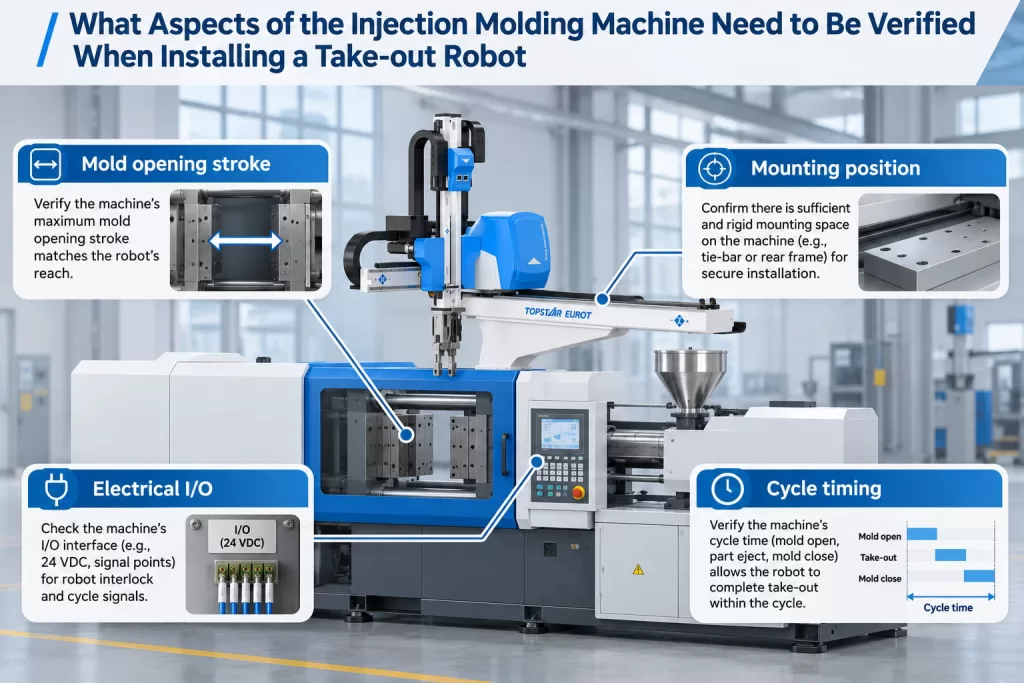
What aspects of the injection molding machine need to be verified when installing a Take-out Robot?
The first step is to understand the physical structure and operating conditions of the existing injection molding machine. Injection molding machines of different brands and models vary in platen structure, mounting interfaces, mold dimensions, and opening stroke. It is essential to ensure that the Cartesian robot you purchase not only meets these requirements but also leaves sufficient space to guarantee unobstructed mold movement and part retrieval. Therefore, assessments must be based on the injection molding machine’s technical drawings and actual on-site measurement data.
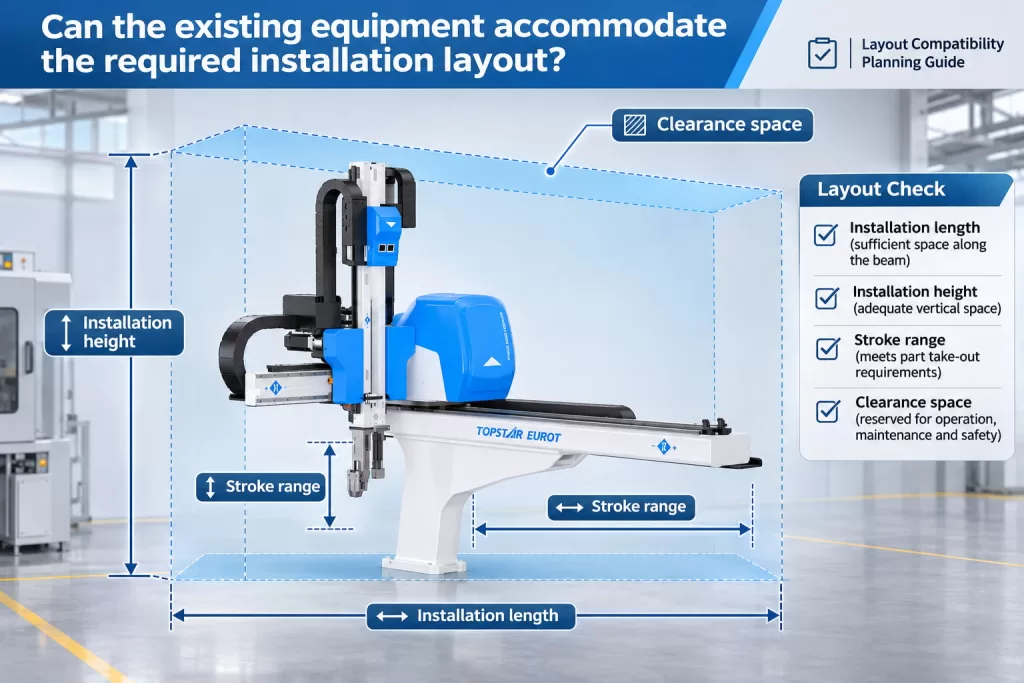
Can the existing equipment accommodate the required installation layout?
Before selecting an injection molding robot, you must clarify its mounting method: whether it will be mounted above or on the side of the injection molding machine.
Typically, the following information needs to be verified:
- Available mounting locations and support structures for the robot.
- The location, dimensions, and thread specifications of mounting holes.
- Available mounting height and clearance around surrounding structures.
- The allowable load capacity and rigidity of the support structures.
Some injection molding machines come with dedicated robot mounting interfaces, while other models may require additional mounting brackets or structural modifications.
Mounting hole layouts and load-bearing specifications vary across different brands of injection molding machines. Therefore, we recommend consulting the installation drawings for the specific machine model and comparing them with actual on-site measurements before finalizing the installation plan.
This approach effectively helps avoid issues such as mismatched mounting locations, insufficient structural support, or interference between the robot base and existing equipment.
Is there sufficient space for mold opening and part removal?
Installation compatibility does not guarantee that the take-out robot will operate properly. The next step is to confirm whether the injection molding machine provides sufficient space to accommodate the entire part-removal sequence.
Measure the mold opening stroke, mold height, tie-bar spacing, platen dimensions, and the available vertical space above the mold. These dimensions determine whether the robotic arm can enter the mold cavity, reach the gripping position, and remove the product without interference.
Additionally, the characteristics of the part itself must be considered. For large or deep-cavity products, a longer robotic arm reach may be required, or the entry position may need to be adjusted. Therefore, when evaluating the installation of a Cartesian robot or linear robot, its complete motion path must be taken into account:
Robot entry → Gripping the part → Exiting the mold → Moving to the mold’s safety zone → Transferring the part.
Verifying this sequence of movements in advance, before mechanical installation begins, helps identify space constraints early and avoid potential collision risks.
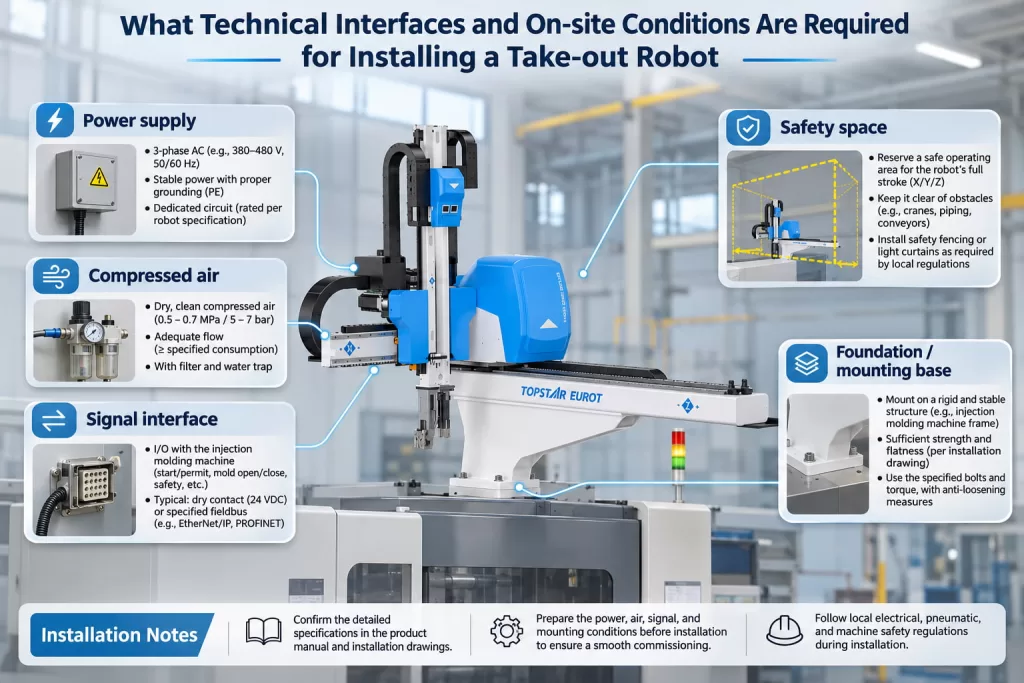
What technical interfaces and on-site conditions are required for installing a take-out robot?
After confirming the mechanical installation conditions, the focus should shift to equipment integration. The take-out robot must exchange signals with the existing injection molding machine and coordinate its movements with mold opening, ejection operations, and other production signals. In addition, the factory must prepare the necessary power supply, compressed air, fixtures, and downstream connection facilities. Confirm these requirements before installation so commissioning can focus on motion adjustments and process synchronization, rather than missing infrastructure or incompatible interfaces.
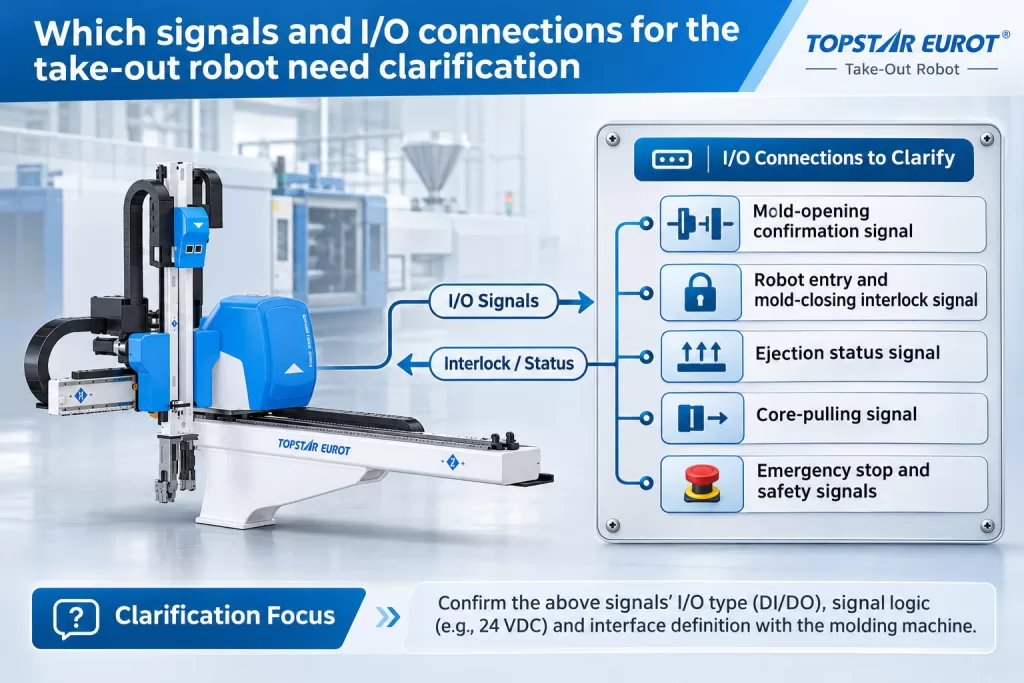
Which signals and I/O connections for the take-out robot need clarification?
Signal exchange between the injection molding machine and the robot is essential to coordinate their respective operating sequences.
Before installation, technicians should identify the machine’s existing interfaces and confirm the types of signals they can provide. Common signals include:
- Mold-opening confirmation signal: Ensures the robot enters the mold when the mold reaches the predetermined open position.
- Robot entry and mold-closing interlock signal: Prevents the mold from closing while the robot is within the work area.
- Ejection status signal: Coordinates the part-removal action with the forward and reverse movements of the ejection mechanism.
- Core-pulling signal: Synchronizes the robot’s part retrieval with the mold’s core-pulling action when core-pulling is involved.
- Emergency stop and safety signals: Coordinate safety protection actions between the robot and the injection molding machine.
Specific I/O requirements depend on the machine controller, robot configuration, and the intended automation workflow.
Topstar’s integrated control technology supports signal synchronization between the machine and the robot, covering coordinated control for mold opening, ejection, and safety-related functions. (You can refer to this guide for more information:《injection robot integration guide》)
Before installation, please have the machine’s electrical schematics, a list of available I/O points, communication specifications, and controller-related information ready. This will help engineers better determine whether to use a direct I/O connection or configure an additional communication interface.
Are the supporting facilities, safety conditions, and commissioning requirements in place?
During the final preparation phase, inspect the supporting facilities and confirm that the installation area is ready for commissioning.
Electrical and Pneumatic Connections: Verify the power supply, grounding, compressed air supply, and cable routing space required for the robot. If the end-of-arm tooling uses vacuum suction or pneumatic cylinders, prepare the corresponding connection lines and verify their compatibility with the selected end-of-arm tooling (EOAT).
Downstream Equipment: If the robot needs to transfer products to a conveyor belt, collection bin, inspection station, or other equipment, confirm the location, receiving height, and required I/O signals of these devices before programming the motion sequence.
Safety and Commissioning: Inspect the protective guards, access doors, emergency stop devices, and the interlock functions between the injection molding machine and the robot. During the initial commissioning phase, engineers should test each axis at low speed to verify the gripping and removal positions and confirm the signal logic sequence; before enabling the mold’s automatic closing function, ensure the robot has completely cleared the mold area.
Before officially commencing automated production, the commissioning process should also validate the workpiece removal motion sequence under actual mold and fixture conditions.
Ensuring Successful Installation of the Part-Handling Robot
The successful installation of a take-out robot depends on confirming the following four points before the robot arrives on-site:
- The injection molding machine supports the installation plan;
- There is sufficient clearance for movement between the mold and the workpiece;
- The robot specifications meet the actual load and stroke requirements;
- All equipment interfaces and on-site supporting facilities are ready.
For customers retrofitting an injection molding robot onto an existing injection molding machine, completing these preparatory steps helps minimize the need for modifications during installation, simplifies commissioning, and ensures the newly installed take-out robot can reliably collaborate with existing production equipment.
TRENDING POSTS
- TOPS DAY 2026: Turning Industrial AI into Real-World Impact 2026/11/13
- Breaking Through the Full Scene-to-AI Link! Topstar Industrial Data Collection Matrix Achieves Major Technical Breakthro 2026/11/13
- TOPSTAR Selected in “Forbes China AI Top 50” and Wins “2026 Embodied AI Industry Benchmark Award” 2026/11/13
- Topstar Achieves ISO 13849 Functional Safety Certification for Robotics 2026/11/13
HOT TOPIC
- .ervo motor-driven linear robots
- •
- 1.0 guangdong topstar technology co. ltd
- 1.0 topstar china
- 1.0 topstar robot
- 11
- 160℃ mold temperature controller
- 170 ton injection molding machine
- 2
- 21
- 220-ton injection molding machine
- 23
- 260 ton injection molding machine
- 3 axis robot
- 3 axis robots
- 3 in 1 Compact Dehumidifying Dryer
- 3-axis robot
- 3-axis robots
- 39
- 4 axis robot
- 4-axis SCARA robot
- 41
- 460T injection molding machine
- 5-axis CNC machine
- 62
- 90 ton injection molding machine
- accuracy
- Air Chillers
- air-cooled chillers
- all electric injection molding machine
- all electric injection molding machines
- all-electric injection molding machine
- All-electric injection molding machines
- and overall production quality. Therefore
- AP-RubberPlas
- auto cooling system
- auto loader
- Auto Loaders
- automated injection molding machine
- Automation changed engineering
- automation of injection molding robots
- automotive parts injection molding
- Auxiliary Equipment
- auxiliary machine
- Bench Injection Molding Machine
- cabinet dryer
- Cabinet dryer manufacturers
- Cabinet dryers
- cartesian coordinate robot
- Cartesian Coordinate Robots
- Cartesian injection robot
- Cartesian robot
- Central Feeding System
- Central Feeding Systems
- chiller
- CNC Drilling Machine
- CNC Drilling Machines
- cnc engraving machine manufacturer
- cnc laser cutting machine manufacturer
- CNC machine
- CNC Machine Center
- CNC Machine for Sale
- CNC Machine Manufacturing
- CNC Machine Tool
- CNC machine tool product
- CNC Machining Center
- CNC wood carving machine
- Compact Dehumidifying Dryer
- Cooling system
- Cross-Walking Single Axis Servo Cylinder Robot
- Cross-Walking Single-Axis Servo Cylinder Robot
- Cross-Walking Three-Axis/Five-Axis Servo Driven Robot
- cross-walking three-axis/five-axis servo-driven robot
- Dehumidifier Dryer
- Dehumidifying Dryer
- dehumidifying dryers
- delta parallel robot
- Desktop Injection Molding Machine
- Desktop injection molding machines
- Desktop Molding Machine
- desktop plastic injection machine
- Desktop Plastic Injection Molding Machine
- detachable autoloader
- Digital Transformation
- direct clamp injection molding machine
- Direct clamp injection molding machines
- Dosing & mixing system
- Drilling Centers
- Drying and dehumidification system
- drying and dehumidifying equipment
- Drying and Dehumidifying System
- drying system
- effective and efficient. Cabinet dryers are also used in other industries where large quantities of material need to be dried
- efficient injection molding machine
- elbow hydraulic injection molding machines
- electric injection molding machine
- electric injection molding machines
- energy-efficient injection molding robot
- energy-efficient water chiller
- energy-efficient water chillers
- energy-saving injection molding machine
- etc. Among injection molding robots
- exhibition
- features of CNC machine
- Feeding And Conveying System
- Five Axis Machine Center
- Flexible Production Line
- Fully automatic injection molding machine
- Gathering Topstar
- giant injection molding machine
- GMU-600 5-Axis Machining Center
- Granulating & Recycling System
- granulator machine
- gravimetric blender
- Heavy duty injection molding machine
- Heavy-Duty Take-Out Robot
- High-precision electric molding machines
- high-precision plastic molding machines
- high-speed all electric injection molding machine
- high-speed electric injection molding machine
- High-Speed Packaging Injection Molding
- Honeycomb rotor dehumidifier
- hopper dryer
- Hopper Dryers
- horizontal injection molding machine
- Horizontal Injection Molding Machines
- Horizontal Injection Moulding Machine
- Horizontal Mixer manufacturer
- How The CNC Machine Works
- hybrid injection molding machine
- hydraulic injection molding machine
- Hydraulic Injection Molding Machines
- in this article
- Industrial AI
- Industrial Automation
- Industrial robot
- Industrial Robot Chinese brand
- industrial robot parts
- industrial robot supplier
- Industrial robots
- Industry Chain
- Injection Manipulator
- injection manipulator robot
- injection mold machines
- Injection molding
- Injection molding automation
- Injection Molding Automation Solution
- injection molding dryer
- Injection molding equipment
- injection molding hopper dryer
- Injection molding machine
- injection molding machine brand
- Injection Molding Machine Factory
- Injection Molding Machine Manufacture
- Injection molding machine manufacturer
- injection molding machine manufacturers
- Injection molding machine procurement
- injection molding machine robotic arm
- injection molding machine with a robot
- Injection molding machines
- injection molding material dehumidifying
- injection molding plant
- injection molding process
- Injection Molding Robot
- injection molding robot arm
- Injection molding robot automation
- Injection molding robotic arm
- injection molding robots
- injection molding whole plant
- injection moulding dryer
- Injection moulding machine
- injection moulding machines
- Injection Moulding Robots
- Injection Robot
- Injection robot arm
- Injection robot manufacturer
- Injection robot wholesale
- injection robots
- Intelligent Factory
- intelligent injection molding machines
- Intelligent Manufacturing
- intelligent mold temperature
- intelligent mold temperature controller
- Intelligent mould temperature controller
- intelligent whole plant solution
- InterPlas Thailand 2025
- Introducing Injection Robot
- It is the best choice for drying large quantities of material at once. Cabinetmakers use these machines because they are fast
- Large flow water type mold temperature controller
- large injection molding machine
- large injection molding machines
- Learn what industrial automation and robotics is
- linear robot
- linear robots
- low speed sound-proof granulator
- machine plastic molding
- make sure to add some! Improvements (2) Keyphrase in introduction: Your keyphrase or its synonyms appear in the first paragraph of the copy
- manipulator machine
- manufacturing
- Manufacturing Innovation
- medical grade injection molding machines
- Medical Injection Molding
- medical injection molding machine
- medical injection molding machines
- micro injection molding machine
- middle speed granulator
- Mini CNC machine manufacturers.
- mobile cover making machine
- Mold Temperature Control System
- mold temperature controller
- mold temperature controllers
- molding machine
- molding material Dehumidifying System
- mould temperature control system
- mould temperature controller
- mould temperature controller
- mould temperature controllers
- New electric injection molding machine
- Nitrogen Dryer
- nitrogen dryer manufacturer
- nitrogen dryer system manufacturer
- Oil type mold temperature controller
- Oil type mold temperature controllers
- open day
- optical component injection molding
- Optical-grade dehumidifying dryer
- Outbound links: No outbound links appear in this page. Add some! Images: No images appear on this page. Add some! Internal links: No internal links appear in this page
- packaging injection molding
- Packaging Solutions
- PET Preform injection molding
- phone case maker machine
- phone case making machine
- phone cover making machine
- PID Control Mold Temperature Controller
- plastic auto loader
- plastic bottle making machine
- plastic bottle manufacturing
- plastic bucket making machine
- plastic bucket manufacturing
- Plastic chair making machine
- plastic dryer for injection molding
- plastic forming equipment
- Plastic Granulator
- Plastic Granulators
- plastic hopper dryer
- plastic injection machine
- plastic injection machines
- plastic injection molding
- Plastic injection molding equipment
- Plastic injection molding machine
- Plastic Injection Molding Machines
- plastic injection moulding machine
- plastic injection moulding machines
- plastic injection robot
- plastic molding
- Plastic Molding Industry
- Plastic Molding machine
- plastic molding machine 1
- Plastic Molding Machines
- plastic molding press
- plastic moulding machine
- plastic phone case making machine
- plastic-molding machine
- powerful granulator
- Powerful Type Sound-Proof Granulator
- precision injection molding
- precision injection molding machines
- production of plastic seats
- pure water mould temperature controller
- Robot injection molding
- robot injection molding machine
- robot manufacturing companies
- Robotic arm for injection molding machine
- robotic injection molding machines
- robotics in injection molding
- SCARA robot
- SCARA robots
- Screw dosers
- Service-oriented manufacturing
- Servo Cylinder Robot
- servo driven robot
- Servo Driven Robots
- servo injection molding machine
- servo injection robots
- servo motor-driven linear robots
- servo-driven 3-axis robot
- Servo-driven injection molding machine
- Servo-Driven Robot
- Setup of injection machine
- Silicone Injection Molding Machine
- six-axis industrial robot
- Smart Manufacturing
- soundproof granulator
- Sprue Picker
- Stainless Hopper Dryer
- Stainless Hopper Dryers
- star club
- swing arm robot
- T1 Cartesian injection robot
- take-out robot
- take-out robots
- Thailand 4.0
- the choice between servo-driven robots and hydraulic robots will have a certain impact on efficiency
- the most popular injection molding machine
- the type of injection molding robot
- TIC2000 Control System
- TMII injection molding machine
- toggle clamp injection molding machine
- Toggle Hydraulic Injection Molding Machines
- toggle injection molding machine
- Top 10 brands of injection robots
- Topstar
- Topstar Electric Injection Molding Machine InterPlas Thailand 2025 Smart Manufacturing Thailand 4.0
- Topstar Engineering
- Topstar Industrial Robots
- Topstar injection molding intelligent
- Topstar Scara Robots
- Useful Injection molding machine
- Vertical machining centers
- volumetric type blender
- Washing Machine Case Molding Solution
- water chiller
- water chillers
- water distributor
- water type mold temperature controller
- Water Type MoldTemperature Controller
- Water-Cooled Chillers
- Water-cooled Mold Temperature Controller
- water-type mold temperature controller
- Water-Type Mould Temperature Controllers
- We often face choices when performing injection molding. We will choose the type of injection molding machine
- wholesale of injection molding machines
- x carve CNC
- 热门查询 点击次数 展示 排名 topstar